pacman::p_load(spdep, tmap, sf, ClustGeo,
               ggpubr, cluster, factoextra, NbClust,
heatmaply, corrplot, psych, tidyverse, GGally)Geographical Segmentation with Spatially Constrained Clustering Techniques
Analysis
R
sf
tmap
tidyverse
spatstat
spdep
knitr
9.1 Overview
In this hands-on exercise, you will gain hands-on experience on how to delineate homogeneous region by using geographically referenced multivariate data. There are two major analysis, namely:
- hierarchical cluster analysis; and
- spatially constrained cluster analysis.
9.1.1 Learning Outcome
By the end of this hands-on exercise, you will able:
- to convert GIS polygon data into R’s simple feature data.frame by using appropriate functions of sf package of R;
- to convert simple feature data.frame into R’s SpatialPolygonDataFrame object by using appropriate sf of package of R;
- to perform custer analysis by using hclust() of Base R;
- to perform spatially constrained cluster analysis using skater() of Base R; and
- to visualise the analysis output by using ggplot2 and tmap package.
9.2 Getting Started
9.2.1 The analytical question
In geobusiness and spatial policy, it is a common practice to delineate the market or planning area into homogeneous regions by using multivariate data. In this hands-on exercise, we are interested to delineate Shan State, Myanmar into homogeneous regions by using multiple Information and Communication technology (ICT) measures, namely: Radio, Television, Land line phone, Mobile phone, Computer, and Internet at home.
9.3 The data
Two data sets will be used in this study. They are:
- Myanmar Township Boundary Data (i.e. myanmar_township_boundaries) : This is a GIS data in ESRI shapefile format. It consists of township boundary information of Myanmar. The spatial data are captured in polygon features.
- Shan-ICT.csv: This is an extract of The 2014 Myanmar Population and Housing Census Myanmar at the township level.
Both data sets are download from Myanmar Information Management Unit (MIMU)
9.3.1 Installing and loading R packages
Before we get started, it is important for us to install the necessary R packages into R and launch these R packages into R environment.
The R packages needed for this exercise are as follows:
- Spatial data handling
- sf, rgdal and spdep
- Attribute data handling
- tidyverse, especially readr, ggplot2 and dplyr
- Choropleth mapping
- tmap
- Multivariate data visualisation and analysis
- coorplot, ggpubr, and heatmaply
- Cluster analysis
- cluster
- ClustGeo
The code chunks below installs and launches these R packages into R environment.
Note: With tidyverse, we do not have to install readr, ggplot2 and dplyr packages separately. In fact, tidyverse also installs other very useful R packages such as tidyr.
9.4 Data Import and Prepatation
9.4.1 Importing geospatial data into R environment
In this section, you will import Myanmar Township Boundary GIS data and its associated attrbiute table into R environment.
The Myanmar Township Boundary GIS data is in ESRI shapefile format. It will be imported into R environment by using the st_read() function of sf.
The code chunks used are shown below:
shan_sf <- st_read(dsn = "data/Hands-on_Ex09/geospatial",
                   layer = "myanmar_township_boundaries") %>%
  filter(ST %in% c("Shan (East)", "Shan (North)", "Shan (South)")) %>%
  select(c(2:7))
Reading layer `myanmar_township_boundaries' from data source
`C:\Users\blzll\OneDrive\Desktop\Y3S1\IS415\Quarto\IS415\Hands-on_Ex\data\Hands-on_Ex09\geospatial'
using driver `ESRI Shapefile'
Simple feature collection with 330 features and 14 fields
Geometry type: MULTIPOLYGON
Dimension: XY
Bounding box: xmin: 92.17275 ymin: 9.671252 xmax: 101.1699 ymax: 28.54554
Geodetic CRS: WGS 84The imported township boundary object is called shan_sf. It is saved in simple feature data.frame format. We can view the content of the newly created shan_sf simple features data.frame by using the code chunk below.
shan_sfSimple feature collection with 55 features and 6 fields
Geometry type: MULTIPOLYGON
Dimension: XY
Bounding box: xmin: 96.15107 ymin: 19.29932 xmax: 101.1699 ymax: 24.15907
Geodetic CRS: WGS 84
First 10 features:
ST ST_PCODE DT DT_PCODE TS TS_PCODE
1 Shan (North) MMR015 Mongmit MMR015D008 Mongmit MMR015017
2 Shan (South) MMR014 Taunggyi MMR014D001 Pindaya MMR014006
3 Shan (South) MMR014 Taunggyi MMR014D001 Ywangan MMR014007
4 Shan (South) MMR014 Taunggyi MMR014D001 Pinlaung MMR014009
5 Shan (North) MMR015 Mongmit MMR015D008 Mabein MMR015018
6 Shan (South) MMR014 Taunggyi MMR014D001 Kalaw MMR014005
7 Shan (South) MMR014 Taunggyi MMR014D001 Pekon MMR014010
8 Shan (South) MMR014 Taunggyi MMR014D001 Lawksawk MMR014008
9 Shan (North) MMR015 Kyaukme MMR015D003 Nawnghkio MMR015013
10 Shan (North) MMR015 Kyaukme MMR015D003 Kyaukme MMR015012
geometry
1 MULTIPOLYGON (((96.96001 23...
2 MULTIPOLYGON (((96.7731 21....
3 MULTIPOLYGON (((96.78483 21...
4 MULTIPOLYGON (((96.49518 20...
5 MULTIPOLYGON (((96.66306 24...
6 MULTIPOLYGON (((96.49518 20...
7 MULTIPOLYGON (((97.14738 19...
8 MULTIPOLYGON (((96.94981 22...
9 MULTIPOLYGON (((96.75648 22...
10 MULTIPOLYGON (((96.95498 22...Notice that sf.data.frame is conformed to Hardy Wickham’s tidy framework.
Since shan_sf is conformed to tidy framework, we can also glimpse() to reveal the data type of it’s fields.
glimpse(shan_sf)Rows: 55
Columns: 7
$ ST <chr> "Shan (North)", "Shan (South)", "Shan (South)", "Shan (South)…
$ ST_PCODE <chr> "MMR015", "MMR014", "MMR014", "MMR014", "MMR015", "MMR014", "…
$ DT <chr> "Mongmit", "Taunggyi", "Taunggyi", "Taunggyi", "Mongmit", "Ta…
$ DT_PCODE <chr> "MMR015D008", "MMR014D001", "MMR014D001", "MMR014D001", "MMR0…
$ TS <chr> "Mongmit", "Pindaya", "Ywangan", "Pinlaung", "Mabein", "Kalaw…
$ TS_PCODE <chr> "MMR015017", "MMR014006", "MMR014007", "MMR014009", "MMR01501…
$ geometry <MULTIPOLYGON [°]> MULTIPOLYGON (((96.96001 23..., MULTIPOLYGON (((…9.4.2 Importing aspatial data into R environment
The csv file will be import using read_csv function of readr package.
The code chunks used are shown below:
ict <- read_csv ("data/Hands-on_Ex09/aspatial/Shan-ICT.csv")The imported InfoComm variables are extracted from The 2014 Myanmar Population and Housing Census Myanmar. The attribute data set is called ict. It is saved in R’s * tibble data.frame* format.
The code chunk below reveal the summary statistics of ict data.frame.
summary(ict) District Pcode District Name Township Pcode Township Name
Length:55 Length:55 Length:55 Length:55
Class :character Class :character Class :character Class :character
Mode :character Mode :character Mode :character Mode :character
Total households Radio Television Land line phone
Min. : 3318 Min. : 115 Min. : 728 Min. : 20.0
1st Qu.: 8711 1st Qu.: 1260 1st Qu.: 3744 1st Qu.: 266.5
Median :13685 Median : 2497 Median : 6117 Median : 695.0
Mean :18369 Mean : 4487 Mean :10183 Mean : 929.9
3rd Qu.:23471 3rd Qu.: 6192 3rd Qu.:13906 3rd Qu.:1082.5
Max. :82604 Max. :30176 Max. :62388 Max. :6736.0
Mobile phone Computer Internet at home
Min. : 150 Min. : 20.0 Min. : 8.0
1st Qu.: 2037 1st Qu.: 121.0 1st Qu.: 88.0
Median : 3559 Median : 244.0 Median : 316.0
Mean : 6470 Mean : 575.5 Mean : 760.2
3rd Qu.: 7177 3rd Qu.: 507.0 3rd Qu.: 630.5
Max. :48461 Max. :6705.0 Max. :9746.0 There are a total of eleven fields and 55 observation in the tibble data.frame.
9.4.3 Derive new variables using dplyr package
The unit of measurement of the values are number of household. Using these values directly will be bias by the underlying total number of households. In general, the townships with relatively higher total number of households will also have higher number of households owning radio, TV, etc.
In order to overcome this problem, we will derive the penetration rate of each ICT variable by using the code chunk below.
ict_derived <- ict %>%
  mutate(`RADIO_PR` = `Radio`/`Total households`*1000) %>%
  mutate(`TV_PR` = `Television`/`Total households`*1000) %>%
  mutate(`LLPHONE_PR` = `Land line phone`/`Total households`*1000) %>%
  mutate(`MPHONE_PR` = `Mobile phone`/`Total households`*1000) %>%
  mutate(`COMPUTER_PR` = `Computer`/`Total households`*1000) %>%
  mutate(`INTERNET_PR` = `Internet at home`/`Total households`*1000) %>%
  rename(`DT_PCODE` =`District Pcode`,`DT`=`District Name`,
         `TS_PCODE`=`Township Pcode`, `TS`=`Township Name`,
         `TT_HOUSEHOLDS`=`Total households`,
         `RADIO`=`Radio`, `TV`=`Television`,
         `LLPHONE`=`Land line phone`, `MPHONE`=`Mobile phone`,
         `COMPUTER`=`Computer`, `INTERNET`=`Internet at home`)
Let us review the summary statistics of the newly derived penetration rates using the code chunk below.
summary(ict_derived) DT_PCODE DT TS_PCODE TS
Length:55 Length:55 Length:55 Length:55
Class :character Class :character Class :character Class :character
Mode :character Mode :character Mode :character Mode :character
TT_HOUSEHOLDS RADIO TV LLPHONE
Min. : 3318 Min. : 115 Min. : 728 Min. : 20.0
1st Qu.: 8711 1st Qu.: 1260 1st Qu.: 3744 1st Qu.: 266.5
Median :13685 Median : 2497 Median : 6117 Median : 695.0
Mean :18369 Mean : 4487 Mean :10183 Mean : 929.9
3rd Qu.:23471 3rd Qu.: 6192 3rd Qu.:13906 3rd Qu.:1082.5
Max. :82604 Max. :30176 Max. :62388 Max. :6736.0
MPHONE COMPUTER INTERNET RADIO_PR
Min. : 150 Min. : 20.0 Min. : 8.0 Min. : 21.05
1st Qu.: 2037 1st Qu.: 121.0 1st Qu.: 88.0 1st Qu.:138.95
Median : 3559 Median : 244.0 Median : 316.0 Median :210.95
Mean : 6470 Mean : 575.5 Mean : 760.2 Mean :215.68
3rd Qu.: 7177 3rd Qu.: 507.0 3rd Qu.: 630.5 3rd Qu.:268.07
Max. :48461 Max. :6705.0 Max. :9746.0 Max. :484.52
TV_PR LLPHONE_PR MPHONE_PR COMPUTER_PR
Min. :116.0 Min. : 2.78 Min. : 36.42 Min. : 3.278
1st Qu.:450.2 1st Qu.: 22.84 1st Qu.:190.14 1st Qu.:11.832
Median :517.2 Median : 37.59 Median :305.27 Median :18.970
Mean :509.5 Mean : 51.09 Mean :314.05 Mean :24.393
3rd Qu.:606.4 3rd Qu.: 69.72 3rd Qu.:428.43 3rd Qu.:29.897
Max. :842.5 Max. :181.49 Max. :735.43 Max. :92.402
INTERNET_PR
Min. : 1.041
1st Qu.: 8.617
Median : 22.829
Mean : 30.644
3rd Qu.: 41.281
Max. :117.985 Notice that six new fields have been added into the data.frame. They are RADIO_PR, TV_PR, LLPHONE_PR, MPHONE_PR, COMPUTER_PR, and INTERNET_PR.
9.5 Exploratory Data Analysis (EDA)
9.5.1 EDA using statistical graphics
We can plot the distribution of the variables (i.e. Number of households with radio) by using appropriate Exploratory Data Analysis (EDA) as shown in the code chunk below.
Histogram is useful to identify the overall distribution of the data values (i.e. left skew, right skew or normal distribution)
ggplot(data=ict_derived,
       aes(x=`RADIO`)) +
  geom_histogram(bins=20,
                 color="black",
                 fill="light blue")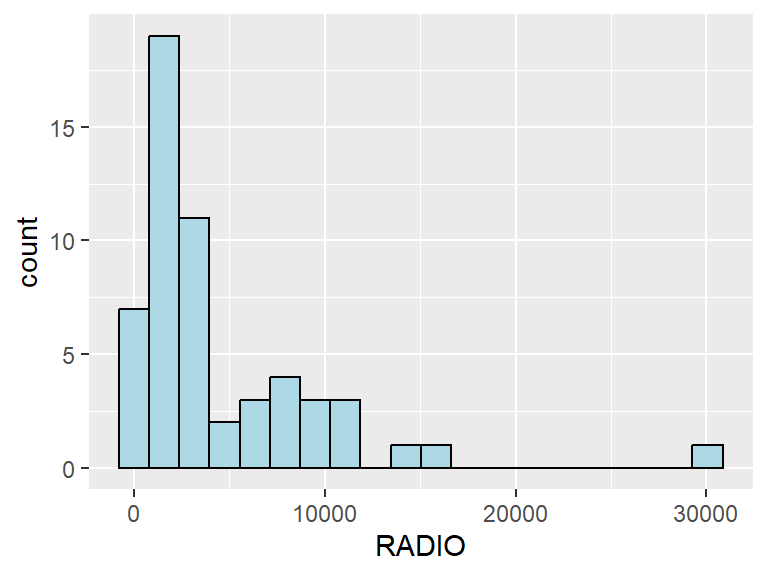
Boxplot is useful to detect if there are outliers.
ggplot(data=ict_derived,
       aes(x=`RADIO`)) +
  geom_boxplot(color="black",
               fill="light blue")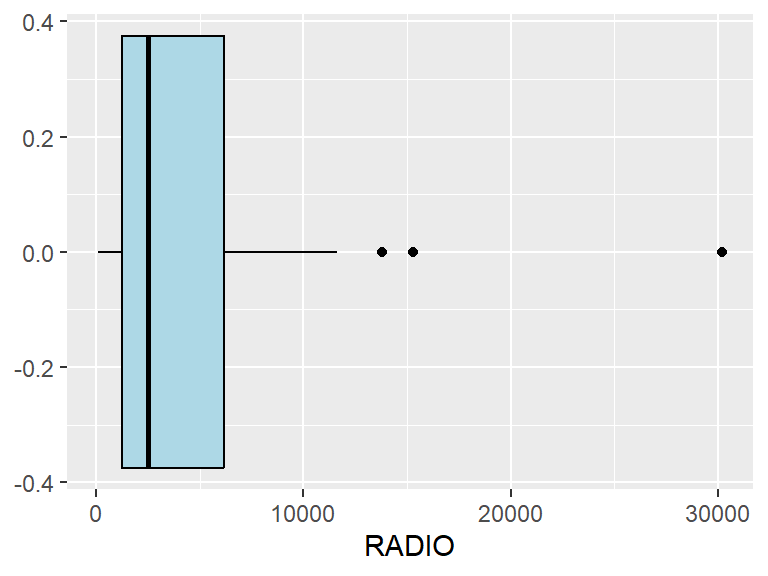
Next, we will also plotting the distribution of the newly derived variables (i.e. Radio penetration rate) by using the code chunk below.
ggplot(data=ict_derived,
       aes(x=`RADIO_PR`)) +
  geom_histogram(bins=20,
                 color="black",
                 fill="light blue")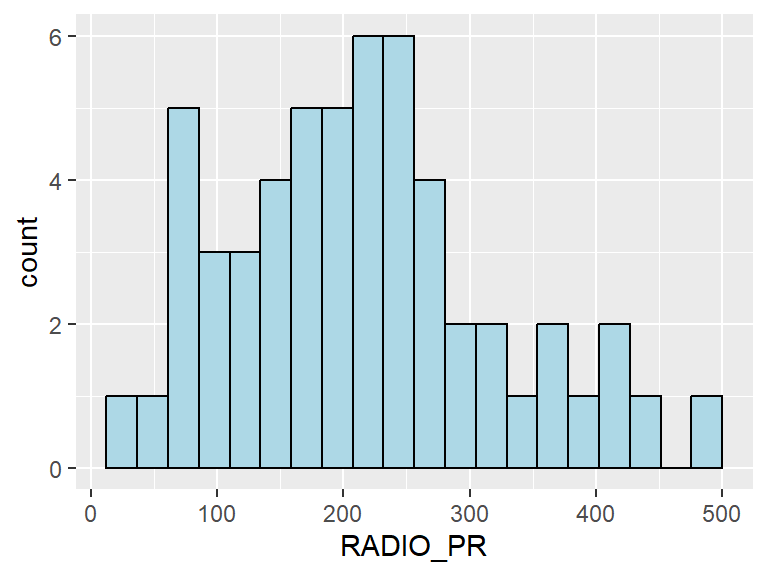
ggplot(data=ict_derived,
       aes(x=`RADIO_PR`)) +
  geom_boxplot(color="black",
               fill="light blue")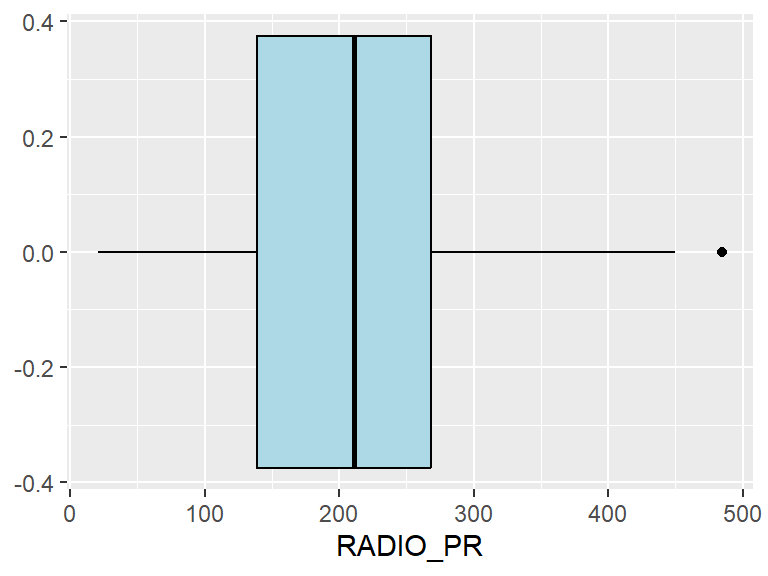
What can you observed from the distributions reveal in the histogram and boxplot.
In the figure below, multiple histograms are plotted to reveal the distribution of the selected variables in the ict_derived data.frame.
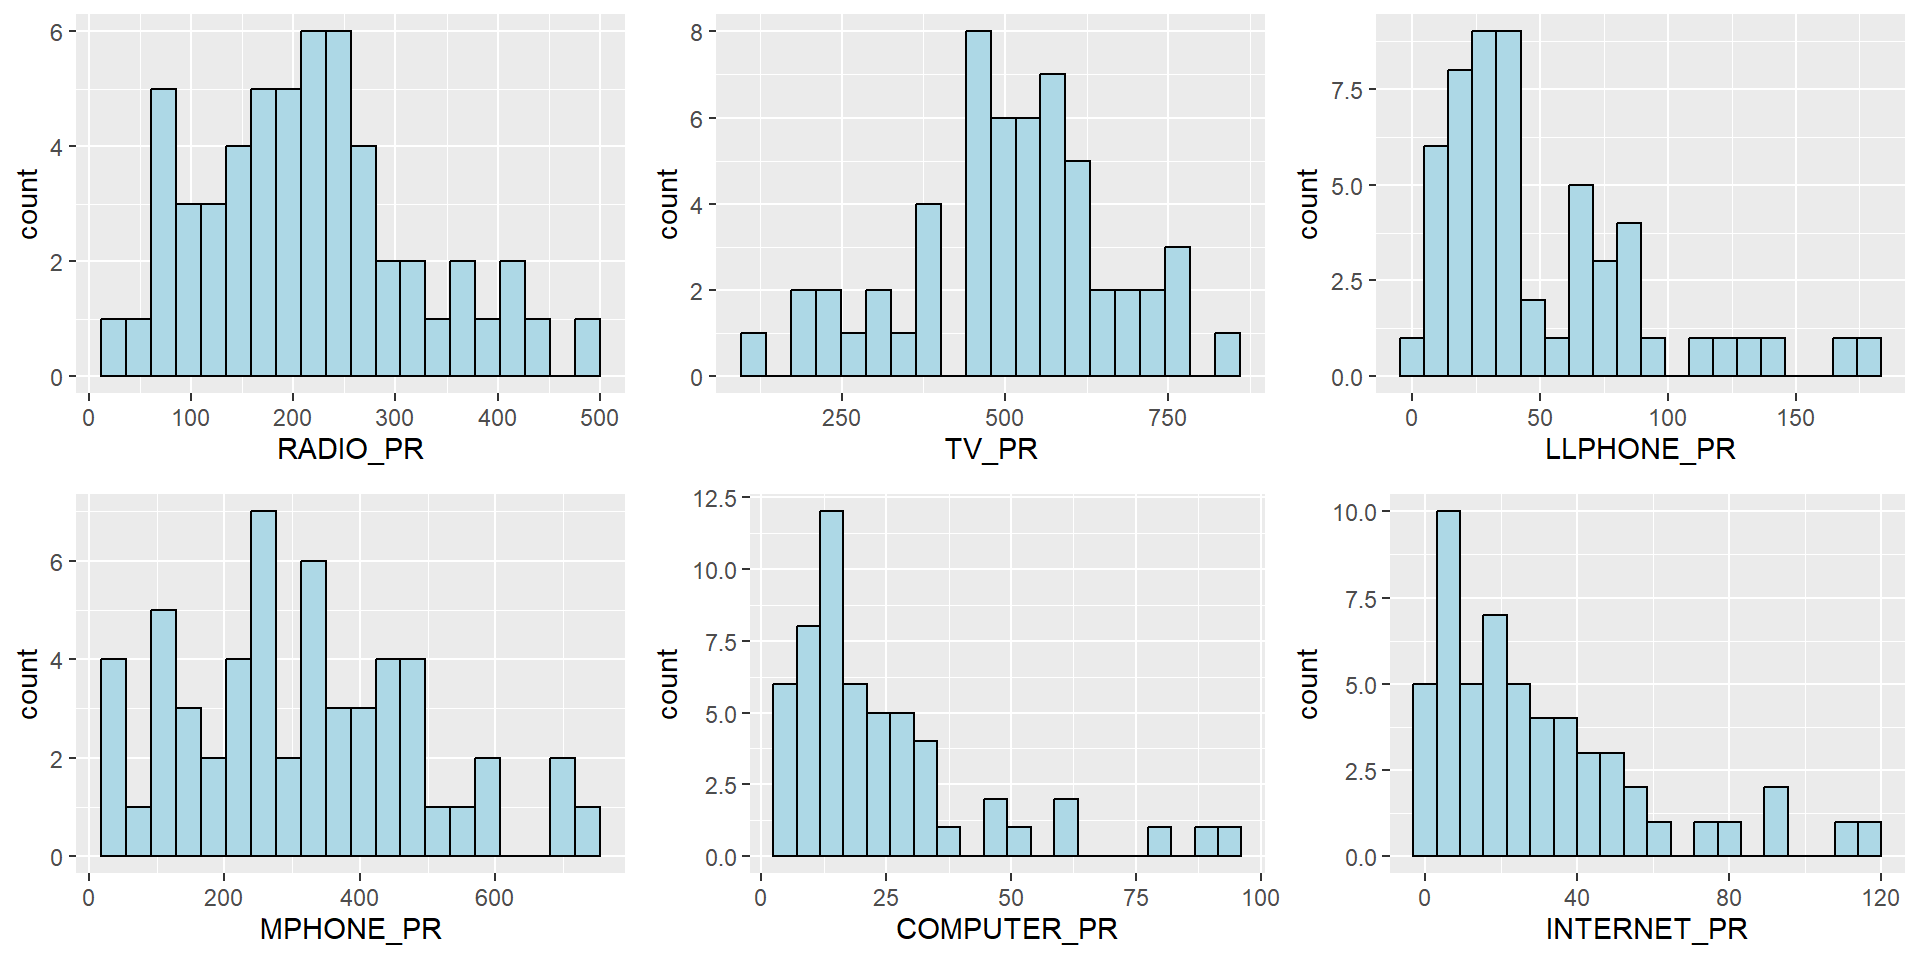
The code chunks below are used to create the data visualisation. They consist of two main parts. First, we will create the individual histograms using the code chunk below.
radio <- ggplot(data=ict_derived,
             aes(x= `RADIO_PR`)) +
  geom_histogram(bins=20,
                 color="black",
                 fill="light blue")

tv <- ggplot(data=ict_derived,
             aes(x= `TV_PR`)) +
  geom_histogram(bins=20,
                 color="black",
                 fill="light blue")

llphone <- ggplot(data=ict_derived,
             aes(x= `LLPHONE_PR`)) +
  geom_histogram(bins=20,
                 color="black",
                 fill="light blue")

mphone <- ggplot(data=ict_derived,
             aes(x= `MPHONE_PR`)) +
  geom_histogram(bins=20,
                 color="black",
                 fill="light blue")

computer <- ggplot(data=ict_derived,
             aes(x= `COMPUTER_PR`)) +
  geom_histogram(bins=20,
                 color="black",
                 fill="light blue")

internet <- ggplot(data=ict_derived,
             aes(x= `INTERNET_PR`)) +
  geom_histogram(bins=20,
                 color="black",
                 fill="light blue")
Next, the ggarrange() function of ggpubr package is used to group these histograms together.
ggarrange(radio, tv, llphone, mphone, computer, internet,
          ncol = 3,
          nrow = 2)
9.5.2 EDA using choropleth map
9.5.2.1 Joining geospatial data with aspatial data
Before we can prepare the choropleth map, we need to combine both the geospatial data object (i.e. shan_sf) and aspatial data.frame object (i.e. ict_derived) into one. This will be performed by using the left_join function of dplyr package. The shan_sf simple feature data.frame will be used as the base data object and the ict_derived data.frame will be used as the join table.
The code chunks below is used to perform the task. The unique identifier used to join both data objects is TS_PCODE.
shan_sf <- left_join(shan_sf,
                     ict_derived, by=c("TS_PCODE"="TS_PCODE"))

write_rds(shan_sf, "data/Hands-on_Ex09/rds/shan_sf.rds")
The message above shows that TS_CODE field is the common field used to perform the left-join.
It is important to note that there is no new output data been created. Instead, the data fields from ict_derived data frame are now updated into the data frame of shan_sf.
shan_sf <- read_rds("data/Hands-on_Ex09/rds/shan_sf.rds")9.5.2.2 Preparing a choropleth map
To have a quick look at the distribution of Radio penetration rate of Shan State at township level, a choropleth map will be prepared.
The code chunks below are used to prepare the choroplethby using the qtm() function of tmap package.
qtm(shan_sf, "RADIO_PR")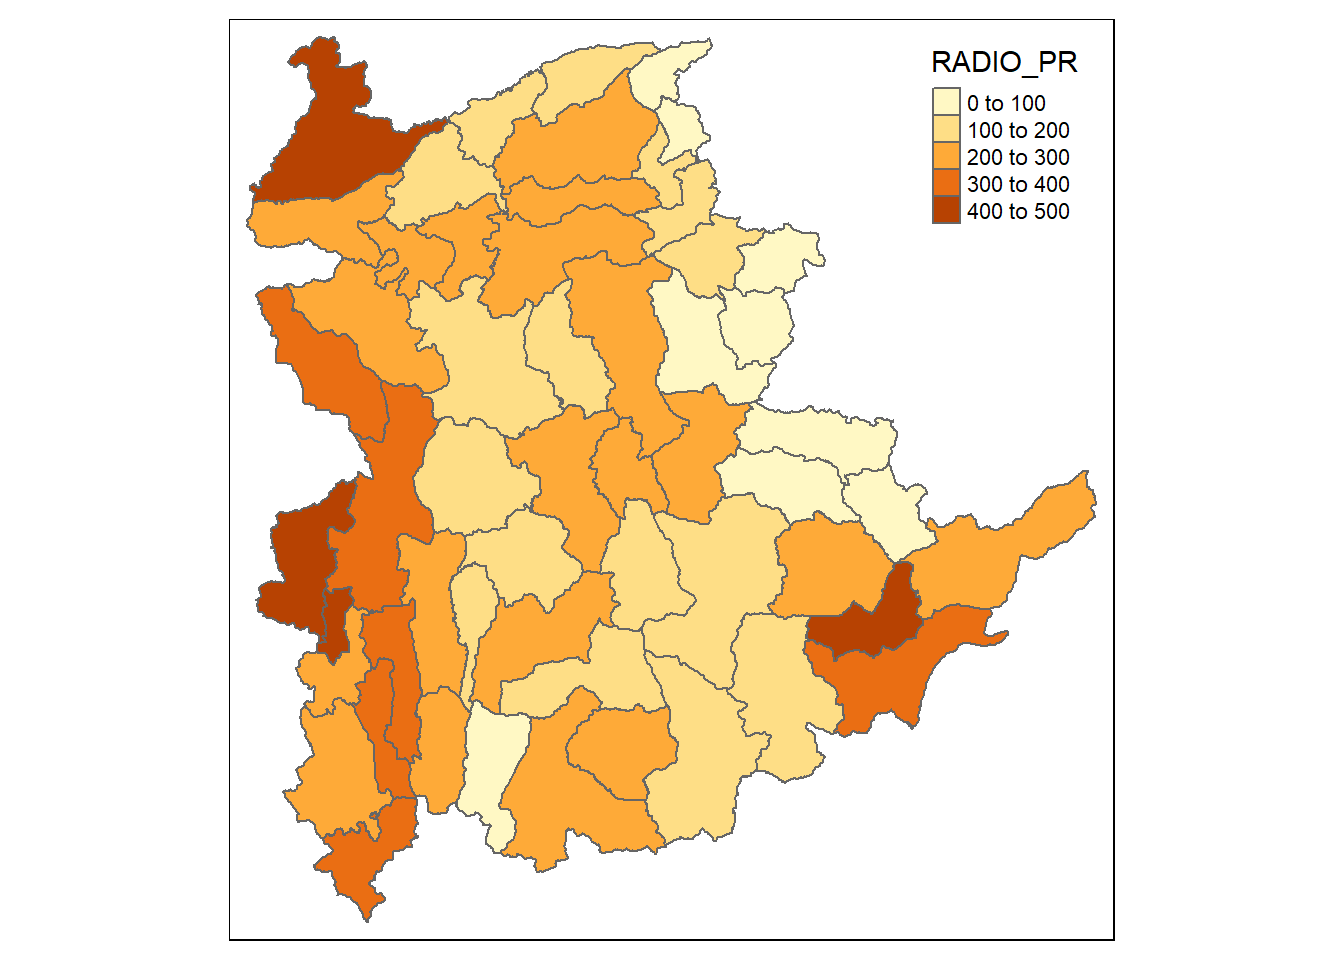
In order to reveal the distribution shown in the choropleth map above are bias to the underlying total number of households at the townships, we will create two choropleth maps, one for the total number of households (i.e. TT_HOUSEHOLDS.map) and one for the total number of household with Radio (RADIO.map) by using the code chunk below.
TT_HOUSEHOLDS.map <- tm_shape(shan_sf) +
  tm_fill(col = "TT_HOUSEHOLDS",
          n = 5,
          style = "jenks",
          title = "Total households") +
  tm_borders(alpha = 0.5)

RADIO.map <- tm_shape(shan_sf) +
  tm_fill(col = "RADIO",
          n = 5,
          style = "jenks",
          title = "Number Radio ") +
  tm_borders(alpha = 0.5)

tmap_arrange(TT_HOUSEHOLDS.map, RADIO.map,
             asp=NA, ncol=2)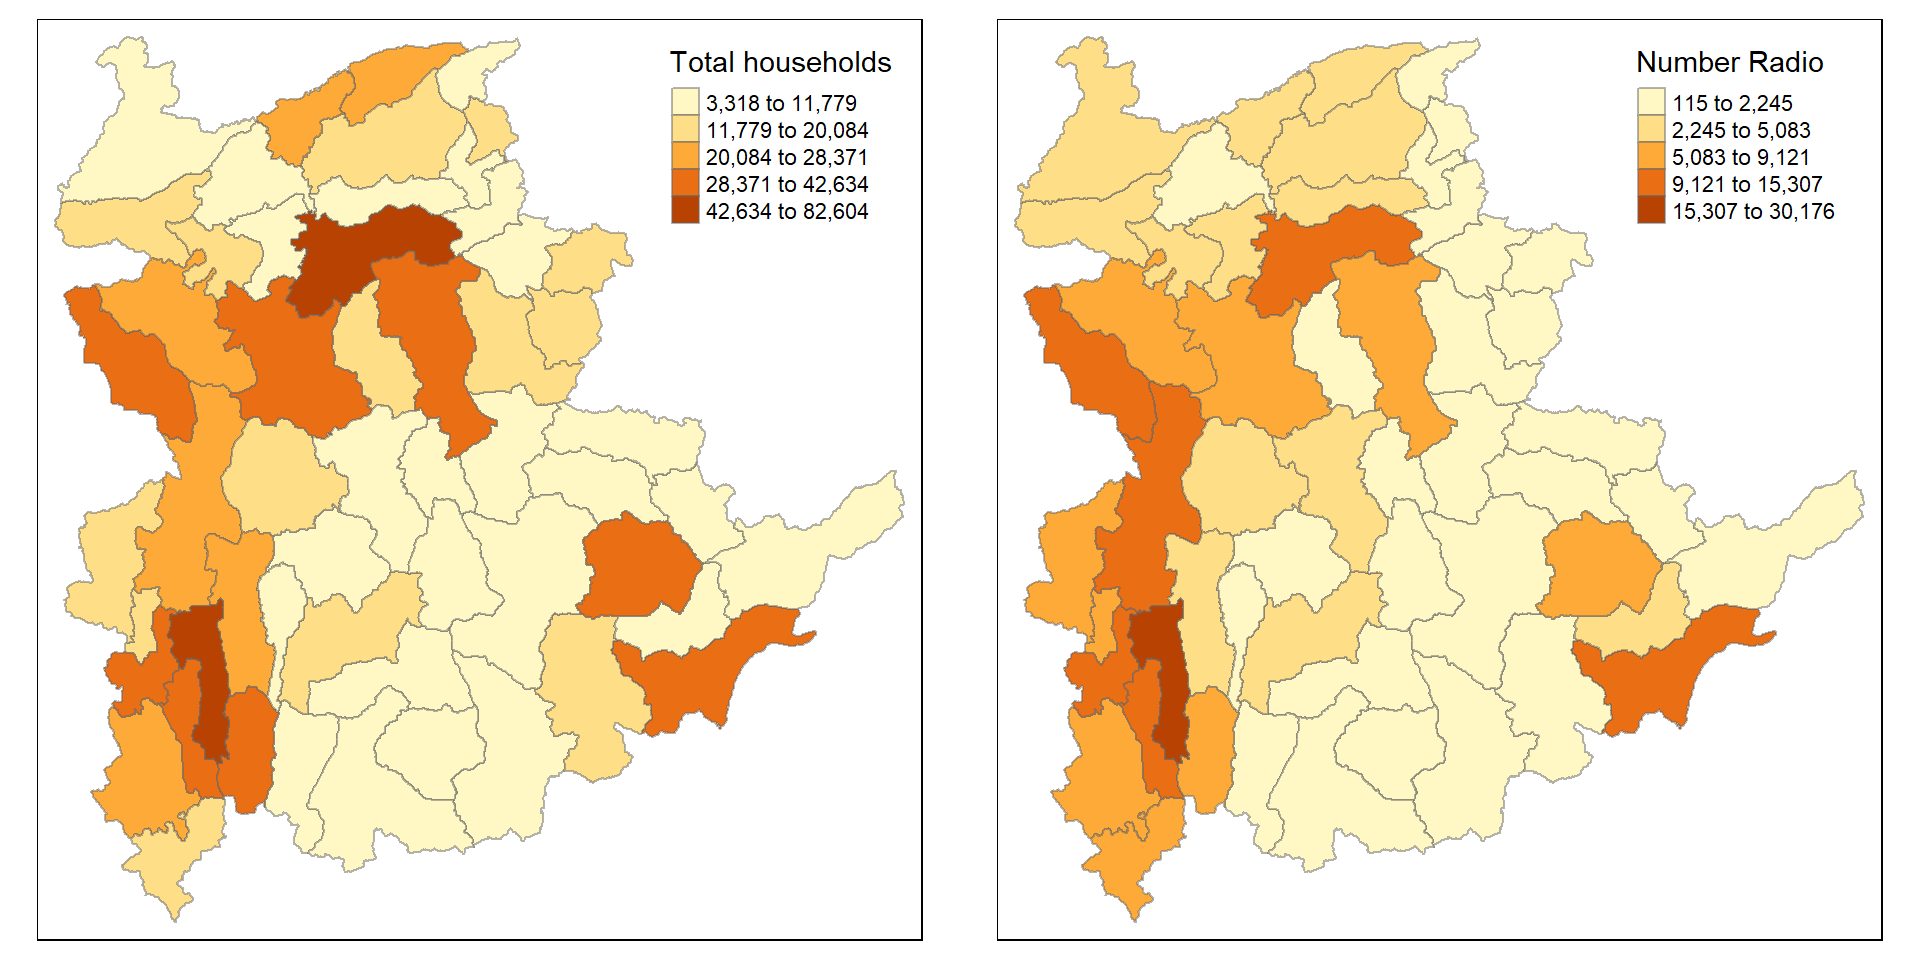
Notice that the choropleth maps above clearly show that townships with relatively larger number of households are also showing relatively higher number of radio ownership.
Now let us plot the choropleth maps showing the retribution of total number of households and Radio penetration rate by using the code chunk below.
tm_shape(shan_sf) +
    tm_polygons(c("TT_HOUSEHOLDS", "RADIO_PR"),
                style="jenks") +
    tm_facets(sync = TRUE, ncol = 2) +
  tm_legend(legend.position = c("right", "bottom"))+
  tm_layout(outer.margins=0, asp=0)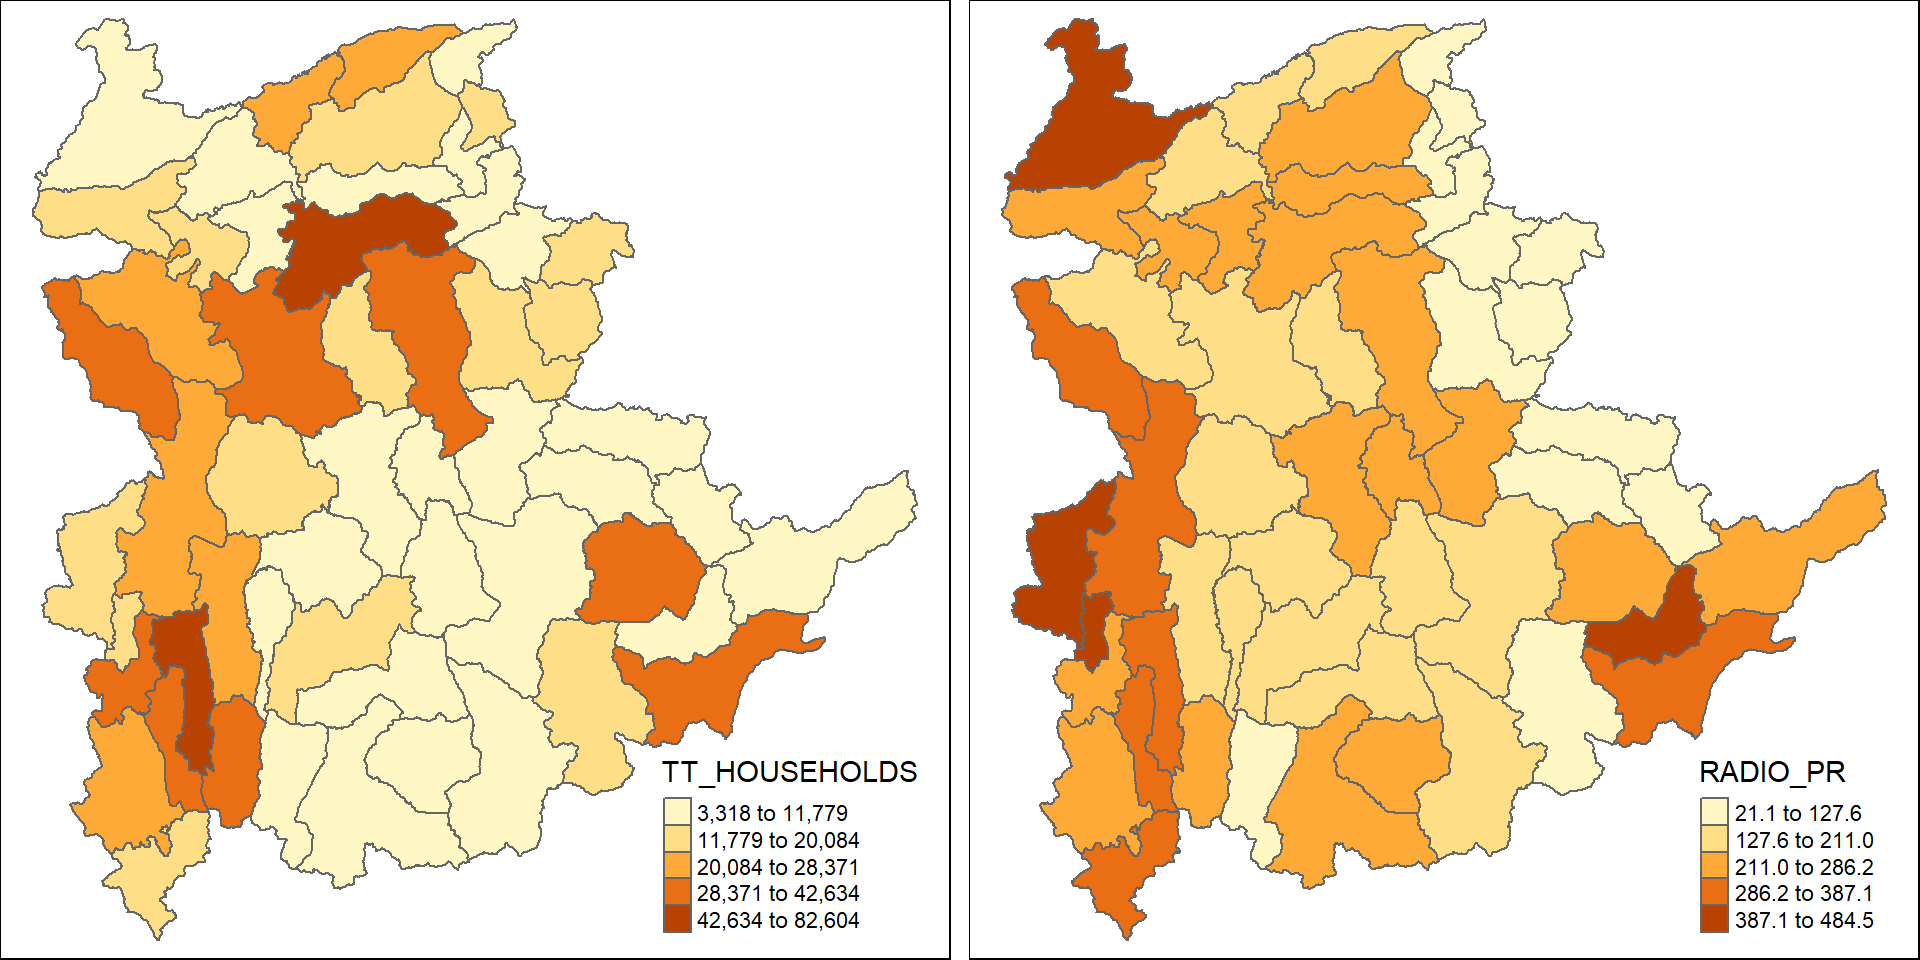
Insights
- Bias in Absolute Figures: If we only look at the left map, larger townships seem more relevant, but the right map (showing penetration rate) gives a more balanced view of radio accessibility.
- Spatial Patterns: The spatial distribution of radio penetration shows some concentration in specific areas that don’t always align with the largest household populations.
This comparison highlights how different metrics (total number of households vs. penetration rate) can reveal different insights into radio ownership across Shan State.
9.6 Correlation Analysis
Before we perform cluster analysis, it is important for us to ensure that the cluster variables are not highly correlated.
In this section, you will learn how to use corrplot.mixed() function of corrplot package to visualise and analyse the correlation of the input variables.
cluster_vars.cor = cor(ict_derived[,12:17])
corrplot.mixed(cluster_vars.cor,
         lower = "ellipse",
               upper = "number",
               tl.pos = "lt",
               diag = "l",
               tl.col = "black")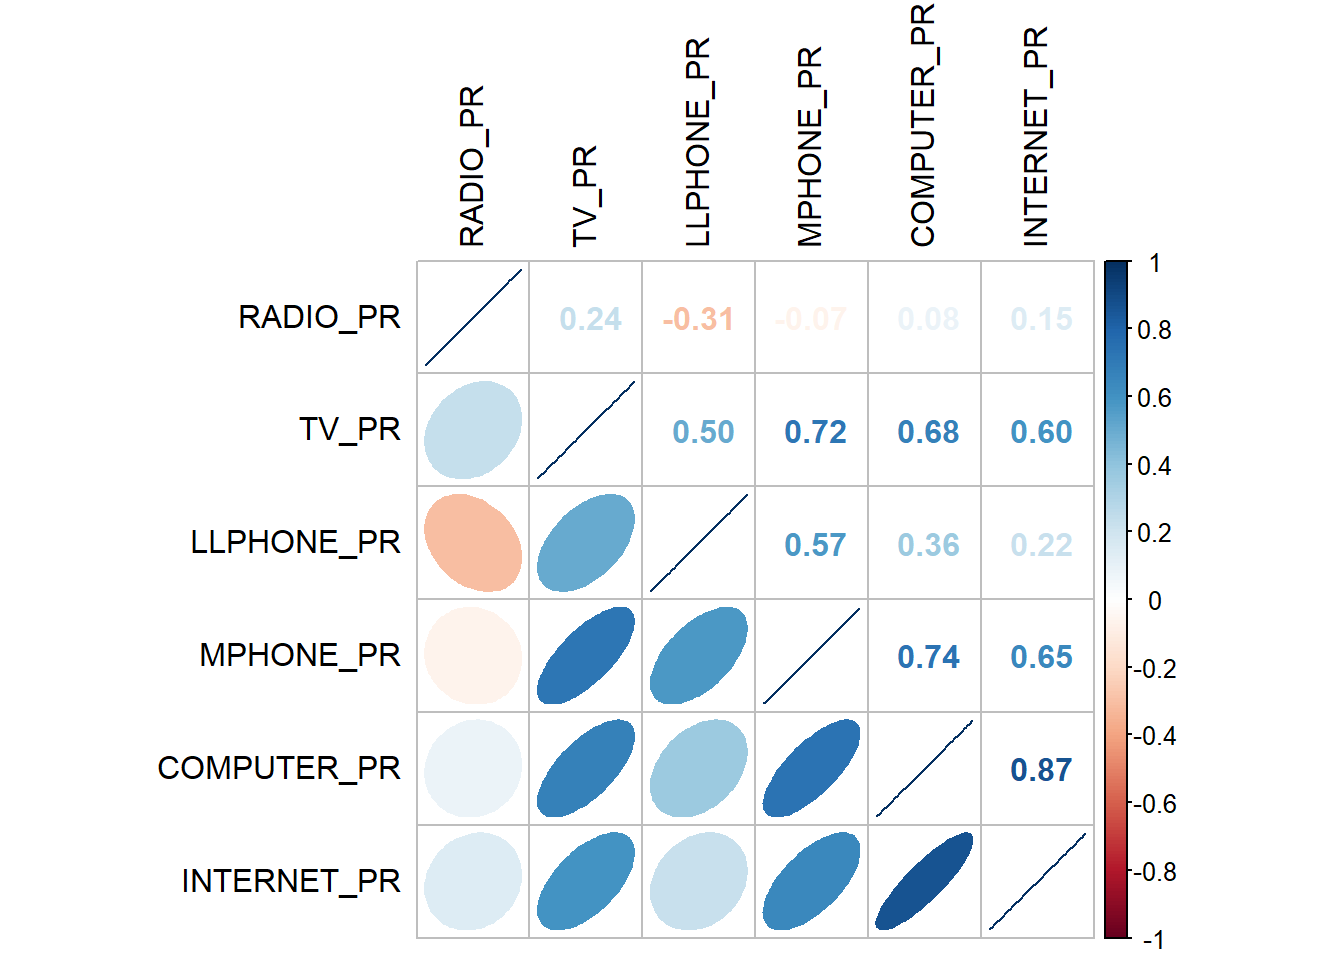
The correlation plot above shows that COMPUTER_PR and INTERNET_PR are highly correlated. This suggest that only one of them should be used in the cluster analysis instead of both.
9.7 Hierarchy Cluster Analysis
In this section, you will learn how to perform hierarchical cluster analysis. The analysis consists of four major steps:
9.7.1 Extracting clustering variables
The code chunk below will be used to extract the clustering variables from the shan_sf simple feature object into data.frame.
cluster_vars <- shan_sf %>%
  st_set_geometry(NULL) %>%
  select("TS.x", "RADIO_PR", "TV_PR", "LLPHONE_PR", "MPHONE_PR", "COMPUTER_PR")
head(cluster_vars,10)
TS.x RADIO_PR TV_PR LLPHONE_PR MPHONE_PR COMPUTER_PR
1 Mongmit 286.1852 554.1313 35.30618 260.6944 12.15939
2 Pindaya 417.4647 505.1300 19.83584 162.3917 12.88190
3 Ywangan 484.5215 260.5734 11.93591 120.2856 4.41465
4 Pinlaung 231.6499 541.7189 28.54454 249.4903 13.76255
5 Mabein 449.4903 708.6423 72.75255 392.6089 16.45042
6 Kalaw 280.7624 611.6204 42.06478 408.7951 29.63160
7 Pekon 318.6118 535.8494 39.83270 214.8476 18.97032
8 Lawksawk 387.1017 630.0035 31.51366 320.5686 21.76677
9 Nawnghkio 349.3359 547.9456 38.44960 323.0201 15.76465
10 Kyaukme 210.9548 601.1773 39.58267 372.4930 30.94709Notice that the final clustering variables list does not include variable INTERNET_PR because it is highly correlated with variable COMPUTER_PR.
Next, we need to change the rows by township name instead of row number by using the code chunk below
row.names(cluster_vars) <- cluster_vars$"TS.x"
head(cluster_vars,10)
TS.x RADIO_PR TV_PR LLPHONE_PR MPHONE_PR COMPUTER_PR
Mongmit Mongmit 286.1852 554.1313 35.30618 260.6944 12.15939
Pindaya Pindaya 417.4647 505.1300 19.83584 162.3917 12.88190
Ywangan Ywangan 484.5215 260.5734 11.93591 120.2856 4.41465
Pinlaung Pinlaung 231.6499 541.7189 28.54454 249.4903 13.76255
Mabein Mabein 449.4903 708.6423 72.75255 392.6089 16.45042
Kalaw Kalaw 280.7624 611.6204 42.06478 408.7951 29.63160
Pekon Pekon 318.6118 535.8494 39.83270 214.8476 18.97032
Lawksawk Lawksawk 387.1017 630.0035 31.51366 320.5686 21.76677
Nawnghkio Nawnghkio 349.3359 547.9456 38.44960 323.0201 15.76465
Kyaukme Kyaukme 210.9548 601.1773 39.58267 372.4930 30.94709Notice that the row number has been replaced into the township name.
Now, we will delete the TS.x field by using the code chunk below.
shan_ict <- select(cluster_vars, c(2:6))
head(shan_ict, 10)
RADIO_PR TV_PR LLPHONE_PR MPHONE_PR COMPUTER_PR
Mongmit 286.1852 554.1313 35.30618 260.6944 12.15939
Pindaya 417.4647 505.1300 19.83584 162.3917 12.88190
Ywangan 484.5215 260.5734 11.93591 120.2856 4.41465
Pinlaung 231.6499 541.7189 28.54454 249.4903 13.76255
Mabein 449.4903 708.6423 72.75255 392.6089 16.45042
Kalaw 280.7624 611.6204 42.06478 408.7951 29.63160
Pekon 318.6118 535.8494 39.83270 214.8476 18.97032
Lawksawk 387.1017 630.0035 31.51366 320.5686 21.76677
Nawnghkio 349.3359 547.9456 38.44960 323.0201 15.76465
Kyaukme 210.9548 601.1773 39.58267 372.4930 30.94709shan_ict <- read_rds("data/Hands-on_Ex09/rds/shan_ict.rds")9.7.2 Data Standardisation
In general, multiple variables will be used in cluster analysis. It is not unusual their values range are different. In order to avoid the cluster analysis result is baised to clustering variables with large values, it is useful to standardise the input variables before performing cluster analysis.
9.7.2 Min-Max standardisation
In the code chunk below, normalize() of heatmaply package is used to stadardisation the clustering variables by using Min-Max method. The summary() is then used to display the summary statistics of the standardised clustering variables.
shan_ict.std <- normalize(shan_ict)
summary(shan_ict.std)
RADIO_PR TV_PR LLPHONE_PR MPHONE_PR
Min. :0.0000 Min. :0.0000 Min. :0.0000 Min. :0.0000
1st Qu.:0.2544 1st Qu.:0.4600 1st Qu.:0.1123 1st Qu.:0.2199
Median :0.4097 Median :0.5523 Median :0.1948 Median :0.3846
Mean :0.4199 Mean :0.5416 Mean :0.2703 Mean :0.3972
3rd Qu.:0.5330 3rd Qu.:0.6750 3rd Qu.:0.3746 3rd Qu.:0.5608
Max. :1.0000 Max. :1.0000 Max. :1.0000 Max. :1.0000
COMPUTER_PR
Min. :0.00000
1st Qu.:0.09598
Median :0.17607
Mean :0.23692
3rd Qu.:0.29868
Max. :1.00000 Notice that the values range of the Min-max standardised clustering variables are 0-1 now.
9.7.3 Z-score standardisation
Z-score standardisation can be performed easily by using scale() of Base R. The code chunk below will be used to stadardisation the clustering variables by using Z-score method.
shan_ict.z <- scale(shan_ict)
describe(shan_ict.z)
vars n mean sd median trimmed mad min max range skew kurtosis
RADIO_PR 1 55 0 1 -0.04 -0.06 0.94 -1.85 2.55 4.40 0.48 -0.27
TV_PR 2 55 0 1 0.05 0.04 0.78 -2.47 2.09 4.56 -0.38 -0.23
LLPHONE_PR 3 55 0 1 -0.33 -0.15 0.68 -1.19 3.20 4.39 1.37 1.49
MPHONE_PR 4 55 0 1 -0.05 -0.06 1.01 -1.58 2.40 3.98 0.48 -0.34
COMPUTER_PR 5 55 0 1 -0.26 -0.18 0.64 -1.03 3.31 4.34 1.80 2.96
se
RADIO_PR 0.13
TV_PR 0.13
LLPHONE_PR 0.13
MPHONE_PR 0.13
COMPUTER_PR 0.13Notice the mean and standard deviation of the Z-score standardised clustering variables are 0 and 1 respectively.
Note: describe() of psych package is used here instead of summary() of Base R because the earlier provides standard deviation.
Warning: Z-score standardisation method should only be used if we would assume all variables come from some normal distribution.
9.7.4 Visualising the standardised clustering variables
Beside reviewing the summary statistics of the standardised clustering variables, it is also a good practice to visualise their distribution graphical.
The code chunk below plot the scaled Radio_PR field.
r <- ggplot(data=ict_derived,
             aes(x= `RADIO_PR`)) +
  geom_histogram(bins=20,
                 color="black",
                 fill="light blue") +
  ggtitle("Raw values without standardisation")

shan_ict_s_df <- as.data.frame(shan_ict.std)
s <- ggplot(data=shan_ict_s_df,
       aes(x=`RADIO_PR`)) +
  geom_histogram(bins=20,
                 color="black",
                 fill="light blue") +
  ggtitle("Min-Max Standardisation")

shan_ict_z_df <- as.data.frame(shan_ict.z)
z <- ggplot(data=shan_ict_z_df,
       aes(x=`RADIO_PR`)) +
  geom_histogram(bins=20,
                 color="black",
                 fill="light blue") +
  ggtitle("Z-score Standardisation")

ggarrange(r, s, z,
          ncol = 3,
          nrow = 1)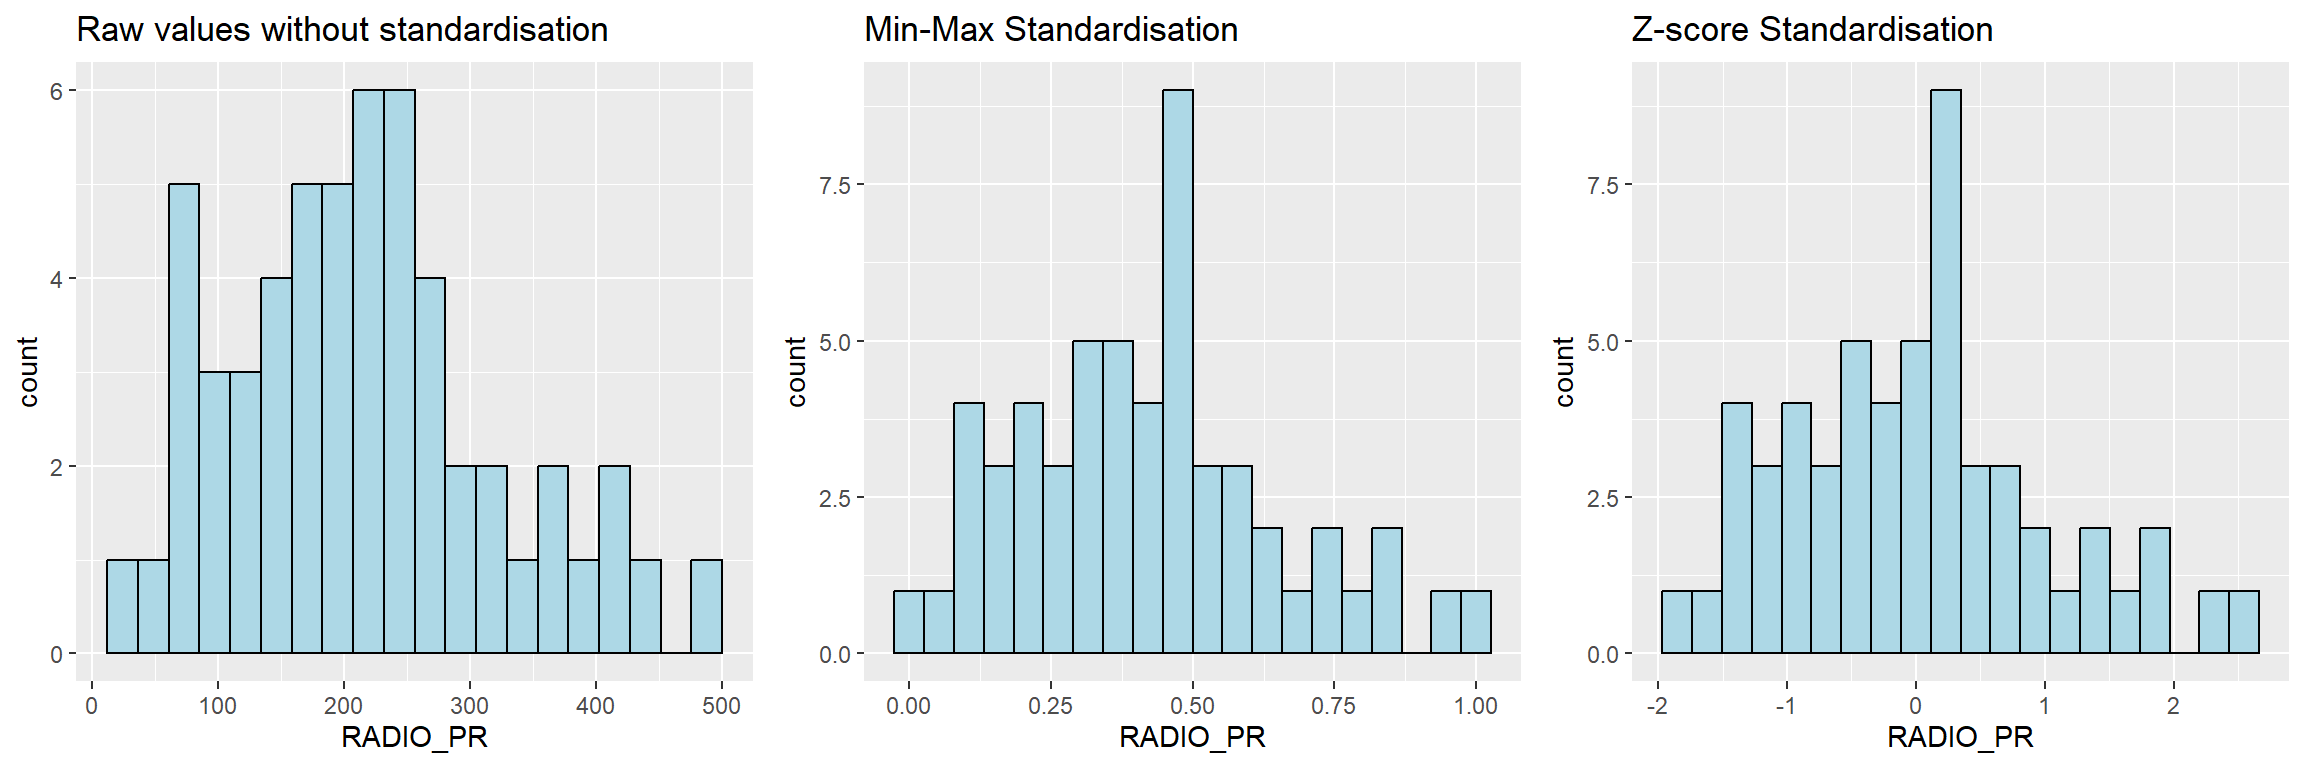
Insights
- Right-Skewed Distribution: In all three histograms, the distribution of
RADIO_PRis right-skewed, meaning that while most townships have moderate levels of radio penetration, there are some townships with significantly higher rates. - Normalization Effects: Both the Min-Max and Z-score standardizations effectively rescale the data, making it easier to analyze and compare across different variables, while maintaining the underlying distribution’s shape.
- Utility of Z-score: Z-score standardization can be particularly useful for identifying outliers and extreme values, as it highlights how far specific data points deviate from the mean in terms of standard deviations.
This analysis shows that while radio penetration is unevenly distributed, standardization techniques allow us to better understand and compare the values, especially in the context of clustering or further statistical analyses.
r <- ggplot(data=ict_derived,
             aes(x= `RADIO_PR`)) +
  geom_density(color="black",
               fill="light blue") +
  ggtitle("Raw values without standardisation")

shan_ict_s_df <- as.data.frame(shan_ict.std)
s <- ggplot(data=shan_ict_s_df,
       aes(x=`RADIO_PR`)) +
  geom_density(color="black",
               fill="light blue") +
  ggtitle("Min-Max Standardisation")

shan_ict_z_df <- as.data.frame(shan_ict.z)
z <- ggplot(data=shan_ict_z_df,
       aes(x=`RADIO_PR`)) +
  geom_density(color="black",
               fill="light blue") +
  ggtitle("Z-score Standardisation")

ggarrange(r, s, z,
          ncol = 3,
          nrow = 1)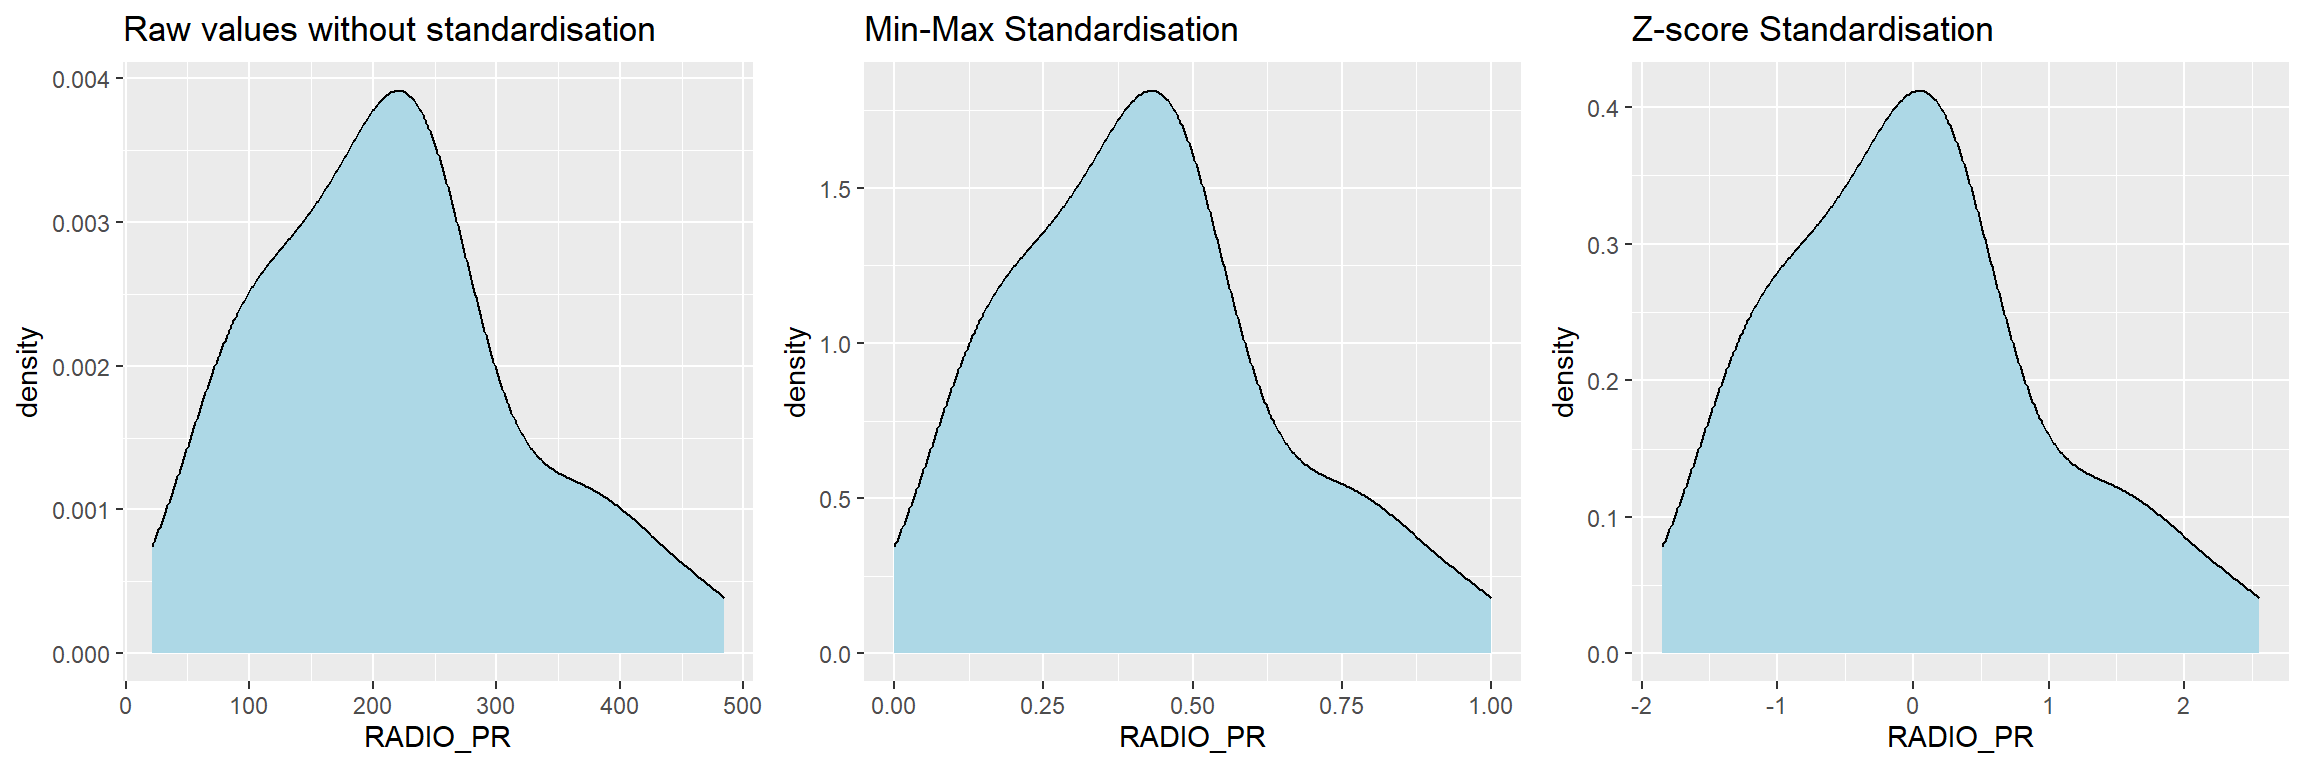
9.7.5 Computing proximity matrix
In R, many packages provide functions to calculate distance matrix. We will compute the proximity matrix by using dist() of R.
dist() supports six distance proximity calculations, they are: euclidean, maximum, manhattan, canberra, binary and minkowski. The default is euclidean proximity matrix.
The code chunk below is used to compute the proximity matrix using euclidean method.
proxmat <- dist(shan_ict, method = 'euclidean')The code chunk below can then be used to list the content of proxmat for visual inspection.
proxmat9.7.6 Computing hierarchical clustering
In R, there are several packages provide hierarchical clustering function. In this hands-on exercise, hclust() of R stats will be used.
hclust() employed agglomeration method to compute the cluster. Eight clustering algorithms are supported, they are: ward.D, ward.D2, single, complete, average(UPGMA), mcquitty(WPGMA), median(WPGMC) and centroid(UPGMC).
The code chunk below performs hierarchical cluster analysis using ward.D method. The hierarchical clustering output is stored in an object of class hclust which describes the tree produced by the clustering process.
hclust_ward <- hclust(proxmat, method = 'ward.D')We can then plot the tree by using plot() of R Graphics as shown in the code chunk below.
plot(hclust_ward, cex = 0.6)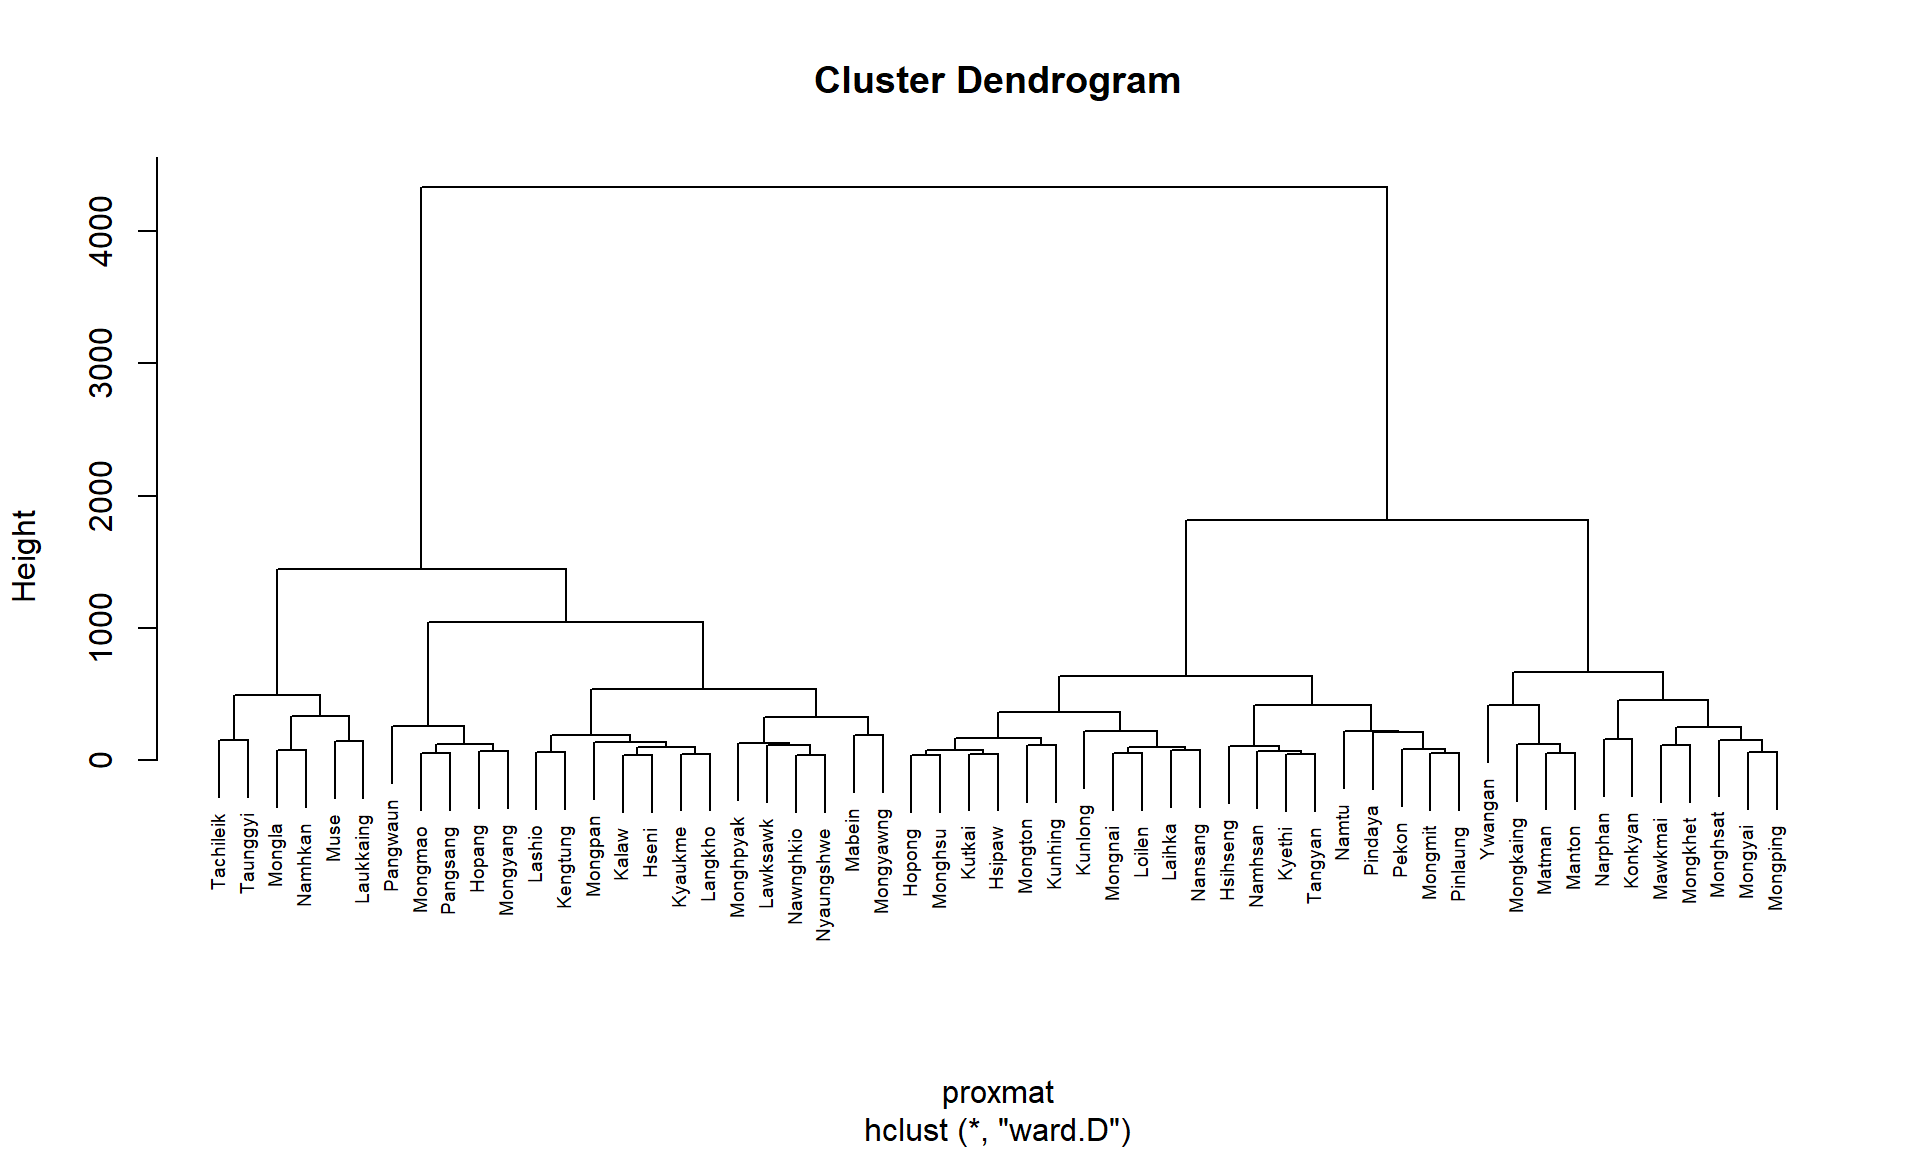
9.7.7 Selecting the optimal clustering algorithm
One of the challenge in performing hierarchical clustering is to identify stronger clustering structures. The issue can be solved by using use agnes() function of cluster package. It functions like hclus(), however, with the agnes() function you can also get the agglomerative coefficient, which measures the amount of clustering structure found (values closer to 1 suggest strong clustering structure).
The code chunk below will be used to compute the agglomerative coefficients of all hierarchical clustering algorithms.
m <- c( "average", "single", "complete", "ward")
names(m) <- c( "average", "single", "complete", "ward")

ac <- function(x) {
  agnes(shan_ict, method = x)$ac
}

map_dbl(m, ac)
average single complete ward
0.8131144 0.6628705 0.8950702 0.9427730 With reference to the output above, we can see that Ward’s method provides the strongest clustering structure among the four methods assessed. Hence, in the subsequent analysis, only Ward’s method will be used.
9.7.8 Determining Optimal Clusters
Another technical challenge face by data analyst in performing clustering analysis is to determine the optimal clusters to retain.
There are three commonly used methods to determine the optimal clusters, they are:
9.7.8.1 Gap Statistic Method
The gap statistic compares the total within intra-cluster variation for different values of k with their expected values under null reference distribution of the data. The estimate of the optimal clusters will be value that maximize the gap statistic (i.e., that yields the largest gap statistic). This means that the clustering structure is far away from the random uniform distribution of points.
To compute the gap statistic, clusGap() of cluster package will be used.
set.seed(12345)
gap_stat <- clusGap(shan_ict,
                    FUN = hcut,
                    nstart = 25,
                    K.max = 10,
                    B = 50)
# Print the result
print(gap_stat, method = "firstmax")
Clustering Gap statistic ["clusGap"] from call:
clusGap(x = shan_ict, FUNcluster = hcut, K.max = 10, B = 50, nstart = 25)
B=50 simulated reference sets, k = 1..10; spaceH0="scaledPCA"
--> Number of clusters (method 'firstmax'): 1
logW E.logW gap SE.sim
[1,] 8.407129 8.680794 0.2736651 0.04460994
[2,] 8.130029 8.350712 0.2206824 0.03880130
[3,] 7.992265 8.202550 0.2102844 0.03362652
[4,] 7.862224 8.080655 0.2184311 0.03784781
[5,] 7.756461 7.978022 0.2215615 0.03897071
[6,] 7.665594 7.887777 0.2221833 0.03973087
[7,] 7.590919 7.806333 0.2154145 0.04054939
[8,] 7.526680 7.731619 0.2049390 0.04198644
[9,] 7.458024 7.660795 0.2027705 0.04421874
[10,] 7.377412 7.593858 0.2164465 0.04540947Also note that the hcut function used is from factoextra package.
Next, we can visualise the plot by using fviz_gap_stat() of factoextra package.
fviz_gap_stat(gap_stat)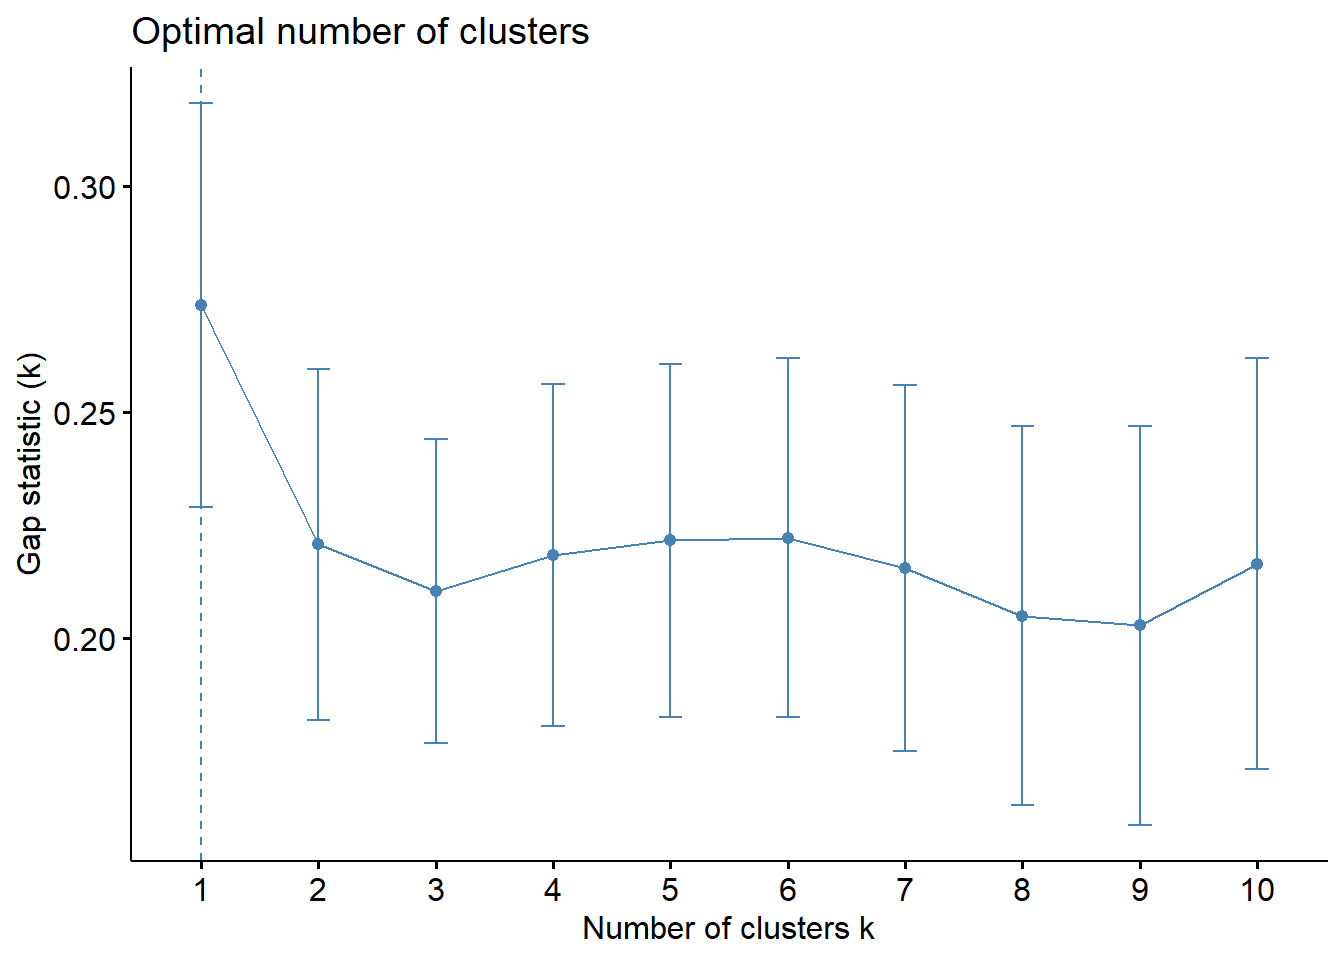
With reference to the gap statistic graph above, the recommended number of cluster to retain is 1. However, it is not logical to retain only one cluster. By examine the gap statistic graph, the 6-cluster gives the largest gap statistic and should be the next best cluster to pick.
Note: In addition to these commonly used approaches, the NbClust package, published by Charrad et al., 2014, provides 30 indices for determining the relevant number of clusters and proposes to users the best clustering scheme from the different results obtained by varying all combinations of number of clusters, distance measures, and clustering methods.
9.7.9 Interpreting the dendrograms
In the dendrogram displayed above, each leaf corresponds to one observation. As we move up the tree, observations that are similar to each other are combined into branches, which are themselves fused at a higher height.
The height of the fusion, provided on the vertical axis, indicates the (dis)similarity between two observations. The higher the height of the fusion, the less similar the observations are. Note that, conclusions about the proximity of two observations can be drawn only based on the height where branches containing those two observations first are fused. We cannot use the proximity of two observations along the horizontal axis as a criteria of their similarity.
It’s also possible to draw the dendrogram with a border around the selected clusters by using rect.hclust() of R stats. The argument border is used to specify the border colors for the rectangles.
plot(hclust_ward, cex = 0.6)
rect.hclust(hclust_ward,
            k = 6,
            border = 2:5)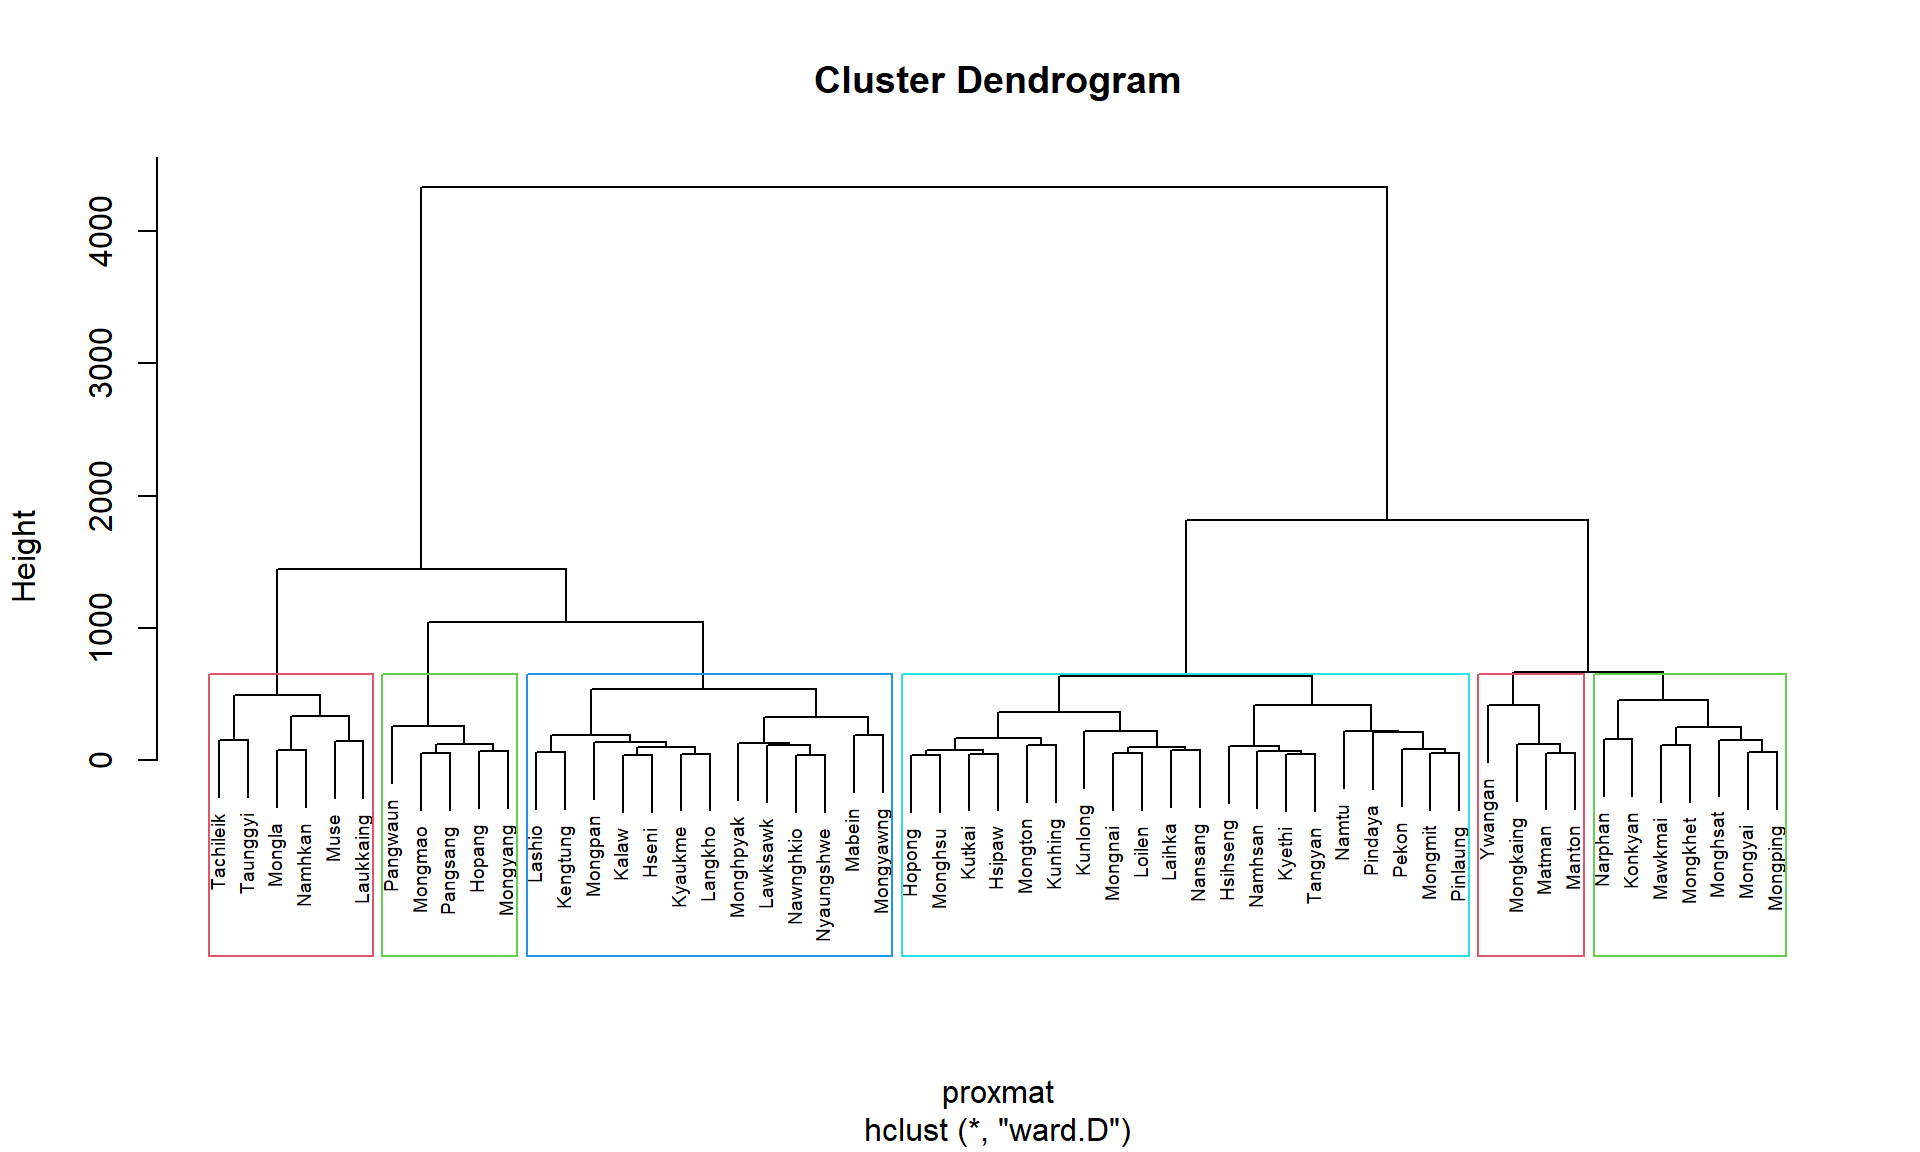
9.7.10 Visually-driven hierarchical clustering analysis
In this section, we will learn how to perform visually-driven hiearchical clustering analysis by using heatmaply package.
With heatmaply, we are able to build both highly interactive cluster heatmap or static cluster heatmap.
9.7.10.1 Transforming the data frame into a matrix
The data was loaded into a data frame, but it has to be a data matrix to make your heatmap.
The code chunk below will be used to transform shan_ict data frame into a data matrix.
shan_ict_mat <- data.matrix(shan_ict)9.7.10.2 Plotting interactive cluster heatmap using heatmaply()
In the code chunk below, the heatmaply() of heatmaply package is used to build an interactive cluster heatmap.
heatmaply(normalize(shan_ict_mat),
          Colv=NA,
          dist_method = "euclidean",
          hclust_method = "ward.D",
          seriate = "OLO",
          colors = Blues,
          k_row = 6,
          margins = c(NA,200,60,NA),
          fontsize_row = 4,
          fontsize_col = 5,
          main="Geographic Segmentation of Shan State by ICT indicators",
          xlab = "ICT Indicators",
          ylab = "Townships of Shan State"
          )
9.7.11 Mapping the clusters formed
With closed examination of the dendragram above, we have decided to retain six clusters.
cutree() of R Base will be used in the code chunk below to derive a 6-cluster model.
groups <- as.factor(cutree(hclust_ward, k=6))The output is called groups. It is a list object.
In order to visualise the clusters, the groups object need to be appended onto shan_sf simple feature object.
The code chunk below form the join in three steps:
- the groups list object will be converted into a matrix;
- cbind() is used to append groups matrix onto shan_sf to produce an output simple feature object called
shan_sf_cluster; and - rename of dplyr package is used to rename as.matrix.groups field as CLUSTER.
shan_sf_cluster <- cbind(shan_sf, as.matrix(groups)) %>%
  rename(`CLUSTER`=`as.matrix.groups.`)
Next, qtm() of tmap package is used to plot the choropleth map showing the cluster formed.
qtm(shan_sf_cluster, "CLUSTER")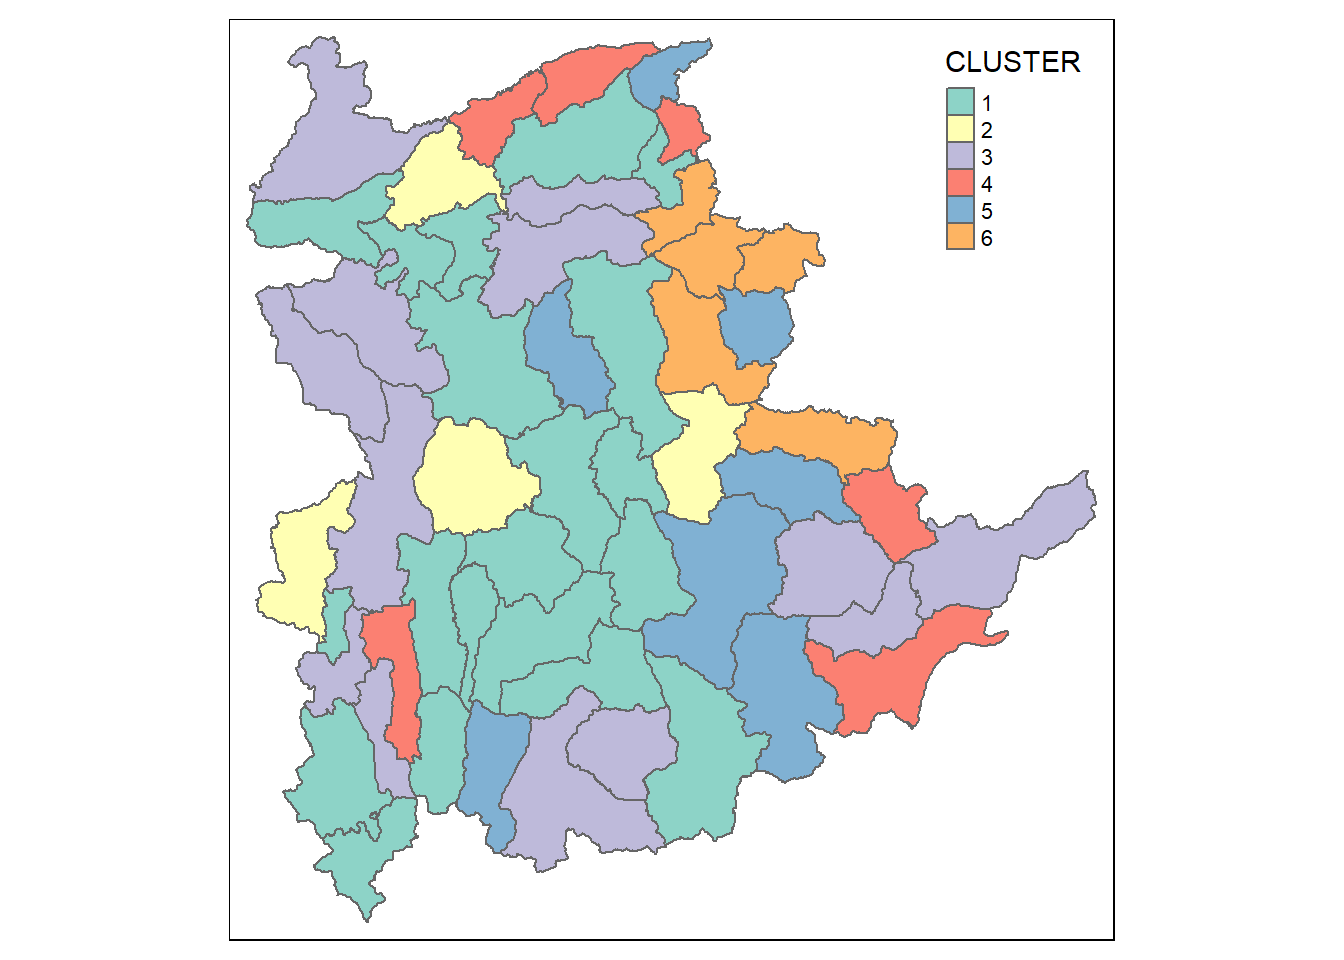
The choropleth map above reveals the clusters are very fragmented. The is one of the major limitation when non-spatial clustering algorithm such as hierarchical cluster analysis method is used.